
Showing posts with label recipes. Show all posts
Showing posts with label recipes. Show all posts
Yet, another Biscoff recipe from Becca... Are you surprised?
I've been wanting to make a batch of cookies for the longest time, but after the great flour shortage of April, it appears that soft brown sugar is May's ingredient in very short supply. (Or it is in my area at least!) So much so, in fact, that I ended up buying a huge 3kg bag of the stuff as it was the only one I could seem to find anywhere, so expect to see a lot of cookies around these parts over the coming weeks!
This Biscoff and White Chocolate Chip Cookie Recipe is adapted from this Copycat Millie’s Cookie Recipe. I changed a few of the quantities and ratios and am VERY pleased with how they turned out, they’re perfectly gooey and oh, so decadent!


125g Soft Brown Sugar
100g Caster Sugar
2 tsp Vanilla Extract
1 Egg
225g Self-Raising Flour
½ tsp Salt
200g White Chocolate (I used a bar and chopped it into pieces)
3 tbsp Biscoff
2. Mix together the butter and sugars until light and creamy.
3. Add the vanilla extract and the egg, and mix some more.
4. Sift the flour into the mix and then add the salt and stir until combined.
5. Add the chocolate, ensuring it’s evenly distributed throughout the dough.
6. Take a golf-ball sized amount of the dough and place a 5p sized dollop of Biscoff in the centre, then roll into a smooth ball.
7. Place onto a baking paper lined tray, leaving space for them to spread.
8. Bake for about 7 minutes, then leave on the tray to set a little more.
Ta-daaaaa, there we have the gooiest, tastiest white chocolate and biscoff cookies everrrrr. I did also make some other variations of these; just plain white chocolate and white chocolate and raspberry, but I think the Biscoff ones are by far the best.
As always, if you have a go at making these please do send me photos, I love to see your bakes!


I've been wanting to make a batch of cookies for the longest time, but after the great flour shortage of April, it appears that soft brown sugar is May's ingredient in very short supply. (Or it is in my area at least!) So much so, in fact, that I ended up buying a huge 3kg bag of the stuff as it was the only one I could seem to find anywhere, so expect to see a lot of cookies around these parts over the coming weeks!
This Biscoff and White Chocolate Chip Cookie Recipe is adapted from this Copycat Millie’s Cookie Recipe. I changed a few of the quantities and ratios and am VERY pleased with how they turned out, they’re perfectly gooey and oh, so decadent!
Biscoff and White Chocolate Chip Cookie Recipe
INGREDIENTS
100g Margarine125g Soft Brown Sugar
100g Caster Sugar
2 tsp Vanilla Extract
1 Egg
225g Self-Raising Flour
½ tsp Salt
200g White Chocolate (I used a bar and chopped it into pieces)
3 tbsp Biscoff
METHOD
1. Preheat the oven to 190 degrees C.2. Mix together the butter and sugars until light and creamy.
3. Add the vanilla extract and the egg, and mix some more.
4. Sift the flour into the mix and then add the salt and stir until combined.
5. Add the chocolate, ensuring it’s evenly distributed throughout the dough.
6. Take a golf-ball sized amount of the dough and place a 5p sized dollop of Biscoff in the centre, then roll into a smooth ball.
7. Place onto a baking paper lined tray, leaving space for them to spread.
8. Bake for about 7 minutes, then leave on the tray to set a little more.
Ta-daaaaa, there we have the gooiest, tastiest white chocolate and biscoff cookies everrrrr. I did also make some other variations of these; just plain white chocolate and white chocolate and raspberry, but I think the Biscoff ones are by far the best.
As always, if you have a go at making these please do send me photos, I love to see your bakes!
What is your favourite flavour cookie?
The Gooiest Biscoff and White Chocolate Chip Cookie Recipe
22.5.20 • baking, biscoff, biscoff recipe, cooking, food, lifestyle, recipe, recipes
Yet, another Biscoff recipe from Becca... Are you surprised?
I've been wanting to make a batch of cookies for the longest time, but after the great flour shortage of April, it appears that soft brown sugar is May's ingredient in very short supply. (Or it is in my area at least!) So much so, in fact, that I ended up buying a huge 3kg bag of the stuff as it was the only one I could seem to find anywhere, so expect to see a lot of cookies around these parts over the coming weeks!
This Biscoff and White Chocolate Chip Cookie Recipe is adapted from this Copycat Millie’s Cookie Recipe. I changed a few of the quantities and ratios and am VERY pleased with how they turned out, they’re perfectly gooey and oh, so decadent!
125g Soft Brown Sugar
100g Caster Sugar
2 tsp Vanilla Extract
1 Egg
225g Self-Raising Flour
½ tsp Salt
200g White Chocolate (I used a bar and chopped it into pieces)
3 tbsp Biscoff
2. Mix together the butter and sugars until light and creamy.
3. Add the vanilla extract and the egg, and mix some more.
4. Sift the flour into the mix and then add the salt and stir until combined.
5. Add the chocolate, ensuring it’s evenly distributed throughout the dough.
6. Take a golf-ball sized amount of the dough and place a 5p sized dollop of Biscoff in the centre, then roll into a smooth ball.
7. Place onto a baking paper lined tray, leaving space for them to spread.
8. Bake for about 7 minutes, then leave on the tray to set a little more.
Ta-daaaaa, there we have the gooiest, tastiest white chocolate and biscoff cookies everrrrr. I did also make some other variations of these; just plain white chocolate and white chocolate and raspberry, but I think the Biscoff ones are by far the best.
As always, if you have a go at making these please do send me photos, I love to see your bakes!
I've been wanting to make a batch of cookies for the longest time, but after the great flour shortage of April, it appears that soft brown sugar is May's ingredient in very short supply. (Or it is in my area at least!) So much so, in fact, that I ended up buying a huge 3kg bag of the stuff as it was the only one I could seem to find anywhere, so expect to see a lot of cookies around these parts over the coming weeks!
This Biscoff and White Chocolate Chip Cookie Recipe is adapted from this Copycat Millie’s Cookie Recipe. I changed a few of the quantities and ratios and am VERY pleased with how they turned out, they’re perfectly gooey and oh, so decadent!
Biscoff and White Chocolate Chip Cookie Recipe
INGREDIENTS
100g Margarine125g Soft Brown Sugar
100g Caster Sugar
2 tsp Vanilla Extract
1 Egg
225g Self-Raising Flour
½ tsp Salt
200g White Chocolate (I used a bar and chopped it into pieces)
3 tbsp Biscoff
METHOD
1. Preheat the oven to 190 degrees C.2. Mix together the butter and sugars until light and creamy.
3. Add the vanilla extract and the egg, and mix some more.
4. Sift the flour into the mix and then add the salt and stir until combined.
5. Add the chocolate, ensuring it’s evenly distributed throughout the dough.
6. Take a golf-ball sized amount of the dough and place a 5p sized dollop of Biscoff in the centre, then roll into a smooth ball.
7. Place onto a baking paper lined tray, leaving space for them to spread.
8. Bake for about 7 minutes, then leave on the tray to set a little more.
Ta-daaaaa, there we have the gooiest, tastiest white chocolate and biscoff cookies everrrrr. I did also make some other variations of these; just plain white chocolate and white chocolate and raspberry, but I think the Biscoff ones are by far the best.
As always, if you have a go at making these please do send me photos, I love to see your bakes!
What is your favourite flavour cookie?
For this week's lockdown bake I figured we'd try something along the same lines as hot cross buns, as I was pretty pleased with how those turned out... After a quick think and a google, I decided that cinnamon buns were going to be this week's mission.
Now, I cannot take any credit for this particular recipe as I followed this Minimalist Baker one word for word - there was no experimenting here! I did, however, use dairy ingredients rather than vegan ones, opting for semi-skimmed milk and unsalted butter, rather than almond milk and dairy-free spread.
I am very pleased with how these turned out and they're a lot less complicated to make than you'd first think. Overall, these only took a couple of hours to whip up, including an hour of proving, so could absolutely be a weekend brunch bake if you're up early and fancy homemade baked goods.
Also, side note, the more and more baking I'm doing, the more I'm starting to wonder whether I should drop the whole marketing career and get a job in a bakery... I'm thoroughly enjoying making all of these recipes and eating the results.
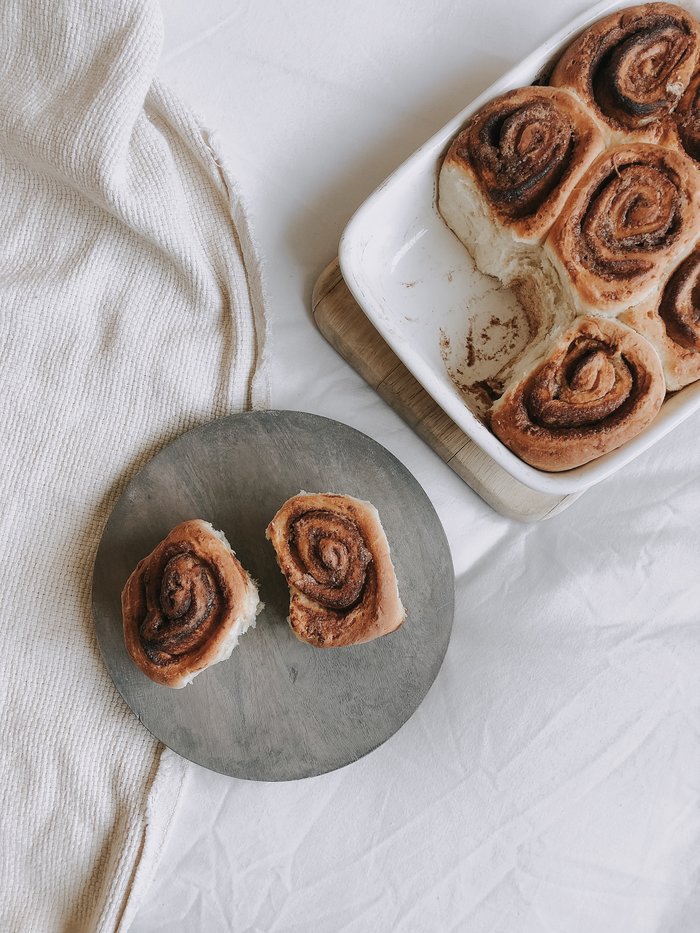


Now, I cannot take any credit for this particular recipe as I followed this Minimalist Baker one word for word - there was no experimenting here! I did, however, use dairy ingredients rather than vegan ones, opting for semi-skimmed milk and unsalted butter, rather than almond milk and dairy-free spread.
I am very pleased with how these turned out and they're a lot less complicated to make than you'd first think. Overall, these only took a couple of hours to whip up, including an hour of proving, so could absolutely be a weekend brunch bake if you're up early and fancy homemade baked goods.
Also, side note, the more and more baking I'm doing, the more I'm starting to wonder whether I should drop the whole marketing career and get a job in a bakery... I'm thoroughly enjoying making all of these recipes and eating the results.
The Cinnamon Bun Recipe
INGREDIENTS
For the dough:
400g Bread Flour
250ml Milk
45g Butter
1 Sachet Yeast
1 tbsp Sugar
Pinch of Salt
For the filling:
45g Butter (Melted)
30g Sugar
2 tbsp Cinnamon
METHOD
1. Place the butter and milk in a mixing bowl and microwave until melted.
2. Once cooled down to a warm (not hot) temperature, add the yeast to the bowl and leave for 10 minutes.
3. Add the sugar and salt.
4. Gradually add the flour, stirring gently.
5. Once it's a thick consistency, tip the dough onto a floured surface and gently knead for a minute until it forms a ball.
6. Place in an oil-coated bowl and cover with oiled cling film, and leave in a warm place for an hour.
7. Roll out the dough into a rectangle shape.
8. Mix the melted butter, sugar and cinnamon, and brush onto the dough.
9. Tightly roll up the dough, and cut into 1-inch pieces.
10. Grease a tin with butter, add the buns and bake at 180 degrees C for about 20 minutes.
Ta-daaaaaa, how simple is that?! In my head, I always imagined Cinnamon Buns were going to be a really complicated thing to bake with lots of intricate steps, but they're really not. I highly recommend!
Ta-daaaaaa, how simple is that?! In my head, I always imagined Cinnamon Buns were going to be a really complicated thing to bake with lots of intricate steps, but they're really not. I highly recommend!
Have you ever made Cinnamon Buns?
For this week's lockdown bake I figured we'd try something along the same lines as hot cross buns, as I was pretty pleased with how those turned out... After a quick think and a google, I decided that cinnamon buns were going to be this week's mission.
Now, I cannot take any credit for this particular recipe as I followed this Minimalist Baker one word for word - there was no experimenting here! I did, however, use dairy ingredients rather than vegan ones, opting for semi-skimmed milk and unsalted butter, rather than almond milk and dairy-free spread.
I am very pleased with how these turned out and they're a lot less complicated to make than you'd first think. Overall, these only took a couple of hours to whip up, including an hour of proving, so could absolutely be a weekend brunch bake if you're up early and fancy homemade baked goods.
Also, side note, the more and more baking I'm doing, the more I'm starting to wonder whether I should drop the whole marketing career and get a job in a bakery... I'm thoroughly enjoying making all of these recipes and eating the results.
The Cinnamon Bun Recipe
INGREDIENTS
For the dough:
400g Bread Flour
250ml Milk
45g Butter
1 Sachet Yeast
1 tbsp Sugar
Pinch of Salt
For the filling:
45g Butter (Melted)
30g Sugar
2 tbsp Cinnamon
METHOD
1. Place the butter and milk in a mixing bowl and microwave until melted.
2. Once cooled down to a warm (not hot) temperature, add the yeast to the bowl and leave for 10 minutes.
3. Add the sugar and salt.
4. Gradually add the flour, stirring gently.
5. Once it's a thick consistency, tip the dough onto a floured surface and gently knead for a minute until it forms a ball.
6. Place in an oil-coated bowl and cover with oiled cling film, and leave in a warm place for an hour.
7. Roll out the dough into a rectangle shape.
8. Mix the melted butter, sugar and cinnamon, and brush onto the dough.
9. Tightly roll up the dough, and cut into 1-inch pieces.
10. Grease a tin with butter, add the buns and bake at 180 degrees C for about 20 minutes.
Ta-daaaaaa, how simple is that?! In my head, I always imagined Cinnamon Buns were going to be a really complicated thing to bake with lots of intricate steps, but they're really not. I highly recommend!
Ta-daaaaaa, how simple is that?! In my head, I always imagined Cinnamon Buns were going to be a really complicated thing to bake with lots of intricate steps, but they're really not. I highly recommend!
Have you ever made Cinnamon Buns?
The UK is currently facing a flour shortage. These are words I didn't think I'd ever find myself typing, let alone during a global pandemic, but here we are. Seeing as the world and his wife is unable to get their hands on any flour, for this weeks' bake I thought we could test out this flourless cookie recipe. Yep, no flour needed here, baby! Coincidentally, this recipe also doesn't need any butter so these beauties were made entirely from things that we have laying around in the cupboards!
Whilst they're called cookies and very much look like cookies, I'd actually say that they're more like meringues than cookies. They're light, but gooey and chewy, and pretty damn tasty if you ask me. Now, they taste even better after being warmed in the microwave for ten seconds - mmm mmmmmmm.
Of all the recipes I've posted here on Becc4, these flourless chocolate chip cookies are by far the easiest to make and can be made, baked and tasted in twenty minutes, can I hear a hooray? No more slaving away in the kitchen for hours, I'm looking at you Biscoff Cheesecake.


Flourless Chocolate Chip Cookie Recipe
INGREDIENTS:
180g Icing Sugar
35g Cocoa powder
1 egg (you only need the white)
2tsp Vanilla Extract
100g Chocolate (chopped into chunks)
Pinch of salt
METHOD:
1. Preheat the oven to 180 degrees C.
2. Combine the icing sugar, cocoa powder and salt in a mixing bowl.
3. Add the vanilla extract and egg white.
4. Stir until a thick liquid is formed.
5. Add the chocolate chunks
6. Dollop onto a paper-lined baking tray, leaving space between each cookie.
7. Bake for 10 minutes and leave to cool on the tray.
And there we have it, a suuuuuper simple, flourless chocolate chip cookie recipe!

The UK is currently facing a flour shortage. These are words I didn't think I'd ever find myself typing, let alone during a global pandemic, but here we are. Seeing as the world and his wife is unable to get their hands on any flour, for this weeks' bake I thought we could test out this flourless cookie recipe. Yep, no flour needed here, baby! Coincidentally, this recipe also doesn't need any butter so these beauties were made entirely from things that we have laying around in the cupboards!
Whilst they're called cookies and very much look like cookies, I'd actually say that they're more like meringues than cookies. They're light, but gooey and chewy, and pretty damn tasty if you ask me. Now, they taste even better after being warmed in the microwave for ten seconds - mmm mmmmmmm.
Of all the recipes I've posted here on Becc4, these flourless chocolate chip cookies are by far the easiest to make and can be made, baked and tasted in twenty minutes, can I hear a hooray? No more slaving away in the kitchen for hours, I'm looking at you Biscoff Cheesecake.
Flourless Chocolate Chip Cookie Recipe
INGREDIENTS:
180g Icing Sugar
35g Cocoa powder
1 egg (you only need the white)
2tsp Vanilla Extract
100g Chocolate (chopped into chunks)
Pinch of salt
METHOD:
1. Preheat the oven to 180 degrees C.
2. Combine the icing sugar, cocoa powder and salt in a mixing bowl.
3. Add the vanilla extract and egg white.
4. Stir until a thick liquid is formed.
5. Add the chocolate chunks
6. Dollop onto a paper-lined baking tray, leaving space between each cookie.
7. Bake for 10 minutes and leave to cool on the tray.
And there we have it, a suuuuuper simple, flourless chocolate chip cookie recipe!
After last weeks' delightful Biscoff Cheesecake Recipe - that even Mary Berry would be proud of - I decided to set myself a little task of making and documenting one bake a week. Now, please don't hold me to this, but I thought it might be a nice way to a) pass some time and b) inspire you to get your pinny on and get baking. As I said in my last post, I'm by no means a baking extraordinaire nor do I have all of the fancy equipment, so if I can do it, you certainly can too!
Considering Easter is literally just around the corner, Hot Cross Buns were of course the only suitable bake for this week. I used this BBC Good Food Recipe and slightly adapted it, and am so happy with how they turned out! Honestly, by the end of lockdown I think I'll be considering a career change because who knew I could make things that taste this good...
Before I start, I'm just gonna be honest and say that these are a bit of a faff to make. The dough needs to rise three separate times for an hour and there are all sorts of other little fiddly steps, so, if you're tight on time or patience I'd head down to your local Asda and pick a packet up for a quid. That being said, I can 100% guarantee they won't be quite as good as these!
The Tastiest Hot Cross Bun Recipe
INGREDIENTS
For the Buns:
300ml milk
50g butter
500g strong bread flour
1 tsp salt
75g caster sugar
7g sachet yeast
1 egg
75g sultanas
50g mixed peel
1 orange
1 tsp mixed spice
½ tsp ground cinnamon
½ tsp ground ginger
For the Cross
75g plain flour
For the glaze
3 tbsp apricot jam
METHOD
1. Bring the milk to the boil, then remove from the heat and add the butter.
2. Leave to cool until lukewarm.
3. Put the bread flour, salt, caster sugar, and yeast into a bowl and make a well in the center.
4. Pour in the warm milk and butter, then add the beaten egg.
5. Mix with a wooden spoon, then bring everything together with your hands until you have a sticky dough.
6. Tip on to a lightly floured surface and knead for 5 mins until smooth.
7. Put the dough in a lightly oiled bowl. Cover with oiled cling film and leave to rise in a warm place for an hour.
8. With the dough still in the bowl, tip in the sultanas, mixed peel, zest of the orange, cinnamon, ginger, and mixed spice.
9. Knead into the dough, making sure everything is well distributed.
10. Leave to rise for another hour covered by well-oiled cling film.
11. Divide the dough into 12 even pieces and roll each into a smooth ball.
12. Place on baking trays lined with parchment, leaving enough space for the dough to expand.
13. Cover with more oiled cling film and set aside for another hour.
14. Heat oven to 220C/200C fan/gas 7.
15. Mix plain flour with about 5 tbsp water to make the paste for the cross – add the water gradually.
16. Spoon into a piping bag with a small nozzle - I used a sandwich bag with the corner snipped off - and pipe a cross on each bun.
17. Bake for 20 minutes, until golden brown.
18. Gently heat the apricot jam to melt it, then brush over the top of the warm buns and leave to cool.
Will you be trying out this Hot Cross Bun Recipe?
What was the last thing you baked?
After last weeks' delightful Biscoff Cheesecake Recipe - that even Mary Berry would be proud of - I decided to set myself a little task of making and documenting one bake a week. Now, please don't hold me to this, but I thought it might be a nice way to a) pass some time and b) inspire you to get your pinny on and get baking. As I said in my last post, I'm by no means a baking extraordinaire nor do I have all of the fancy equipment, so if I can do it, you certainly can too!
Considering Easter is literally just around the corner, Hot Cross Buns were of course the only suitable bake for this week. I used this BBC Good Food Recipe and slightly adapted it, and am so happy with how they turned out! Honestly, by the end of lockdown I think I'll be considering a career change because who knew I could make things that taste this good...
Before I start, I'm just gonna be honest and say that these are a bit of a faff to make. The dough needs to rise three separate times for an hour and there are all sorts of other little fiddly steps, so, if you're tight on time or patience I'd head down to your local Asda and pick a packet up for a quid. That being said, I can 100% guarantee they won't be quite as good as these!
The Tastiest Hot Cross Bun Recipe
INGREDIENTS
For the Buns:
300ml milk
50g butter
500g strong bread flour
1 tsp salt
75g caster sugar
7g sachet yeast
1 egg
75g sultanas
50g mixed peel
1 orange
1 tsp mixed spice
½ tsp ground cinnamon
½ tsp ground ginger
For the Cross
75g plain flour
For the glaze
3 tbsp apricot jam
METHOD
1. Bring the milk to the boil, then remove from the heat and add the butter.
2. Leave to cool until lukewarm.
3. Put the bread flour, salt, caster sugar, and yeast into a bowl and make a well in the center.
4. Pour in the warm milk and butter, then add the beaten egg.
5. Mix with a wooden spoon, then bring everything together with your hands until you have a sticky dough.
6. Tip on to a lightly floured surface and knead for 5 mins until smooth.
7. Put the dough in a lightly oiled bowl. Cover with oiled cling film and leave to rise in a warm place for an hour.
8. With the dough still in the bowl, tip in the sultanas, mixed peel, zest of the orange, cinnamon, ginger, and mixed spice.
9. Knead into the dough, making sure everything is well distributed.
10. Leave to rise for another hour covered by well-oiled cling film.
11. Divide the dough into 12 even pieces and roll each into a smooth ball.
12. Place on baking trays lined with parchment, leaving enough space for the dough to expand.
13. Cover with more oiled cling film and set aside for another hour.
14. Heat oven to 220C/200C fan/gas 7.
15. Mix plain flour with about 5 tbsp water to make the paste for the cross – add the water gradually.
16. Spoon into a piping bag with a small nozzle - I used a sandwich bag with the corner snipped off - and pipe a cross on each bun.
17. Bake for 20 minutes, until golden brown.
18. Gently heat the apricot jam to melt it, then brush over the top of the warm buns and leave to cool.
Will you be trying out this Hot Cross Bun Recipe?
What was the last thing you baked?
Corrr, what would Blogmas be without a bit of baking, eh? Last year I whipped up these INCREDIBLE Triple Chocolate Brownies - if you haven't tried them yet, you absolutely must give them a go, they are phenomenal! I mean, they do contain four bars of chocolate so....
Anyway, this year I thought I'd make something I'd never actually made before: gingerbread. For a first attempt, I'm actually pretty chuffed. They taste fantastic and absolutely filled the house with the smell of Christmas! The recipe is this one from BBC Good Food which I slightly adapted (accidentally, oops!)


You will need:
- 75g margarine
- 50g caster sugar
- ½ tsp bicarbonate of soda
- 50g golden syrup
- 2 egg yolks (and one egg white if, like me, you don't read instructions)
- 250g plain flour
- ½ tsp ground cinnamon
- ½ tsp ground ginger
- Icing sugar (to decorate)
Method:
- Beat the margarine and sugar until creamy.
- Stir in the bicarbonate of soda, golden syrup, and egg yolks.
- Sift in the plain flour, ground cinnamon and ground ginger then mix.
- Knead until the dough comes together, then chill for 30 mins.
- Heat oven to 180C/fan 160C/gas 4.
- Roll out and cut your trees with a cutter (or freehand if you're feeling arty).
- Place onto greased baking sheets and bake for 10 mins until slightly risen and golden brown.
- Cool on a wire rack.
- Mix together some icing sugar and water then drizzle it on top, the more rustic the better!
If you give these a go, I'd looooove to see your photos!
Christmas Gingerbread Trees Recipe
21.12.19 • blogmas, blogmas 2019, christmas, food, recipe, recipes
Corrr, what would Blogmas be without a bit of baking, eh? Last year I whipped up these INCREDIBLE Triple Chocolate Brownies - if you haven't tried them yet, you absolutely must give them a go, they are phenomenal! I mean, they do contain four bars of chocolate so....
Anyway, this year I thought I'd make something I'd never actually made before: gingerbread. For a first attempt, I'm actually pretty chuffed. They taste fantastic and absolutely filled the house with the smell of Christmas! The recipe is this one from BBC Good Food which I slightly adapted (accidentally, oops!)
You will need:
- 75g margarine
- 50g caster sugar
- ½ tsp bicarbonate of soda
- 50g golden syrup
- 2 egg yolks (and one egg white if, like me, you don't read instructions)
- 250g plain flour
- ½ tsp ground cinnamon
- ½ tsp ground ginger
- Icing sugar (to decorate)
Method:
- Beat the margarine and sugar until creamy.
- Stir in the bicarbonate of soda, golden syrup, and egg yolks.
- Sift in the plain flour, ground cinnamon and ground ginger then mix.
- Knead until the dough comes together, then chill for 30 mins.
- Heat oven to 180C/fan 160C/gas 4.
- Roll out and cut your trees with a cutter (or freehand if you're feeling arty).
- Place onto greased baking sheets and bake for 10 mins until slightly risen and golden brown.
- Cool on a wire rack.
- Mix together some icing sugar and water then drizzle it on top, the more rustic the better!
If you give these a go, I'd looooove to see your photos!


A few things to mention; firstly, I didn't have an electric whisk so whisked the eggs and sugar together by hand and got nowhere near the texture the recipe called for. They turned out fine, so don't worry too much about that step. My second faux pas was buying salted butter rather than unsalted, but let me assure you, there's sooooo much chocolate in these that you'd never be able to tell. So, if you have one and not the other, I wouldn't worry too much. My brownies also took way longer than the allocated 25 minutes to bake, so just keep an eye on them and put them back in if you need to. So, onto the recipe...
You will need:
185g unsalted butter
185g best dark chocolate
85g plain flour
40g cocoa powder
50g white chocolate
50g milk chocolate
3 large eggs
275g golden caster sugar
Extra white chocolate to drizzle on top
Method:
1. Preheat the oven to 180C/160C fan/gas mark 4 and line the base of a 20cm square tin with non-stick baking parchment.
2. Cut the butter into small cubes and break the dark chocolate into small pieces, and tip them into a medium-sized bowl.
3. Fill a small saucepan with a little hot water, and place the bowl on top. Use a low heat to melt the chocolate and the butter, stirring occasionally to mix them. Remove from heat and leave to cool to room temperature.
4. Sieve the flour and cocoa powder into another bowl, and combine them
5. Chop the white and milk chocolate into small chunks
6. Break the eggs into a large bowl and tip in the golden caster sugar. With an electric mixer on maximum speed, whisk the eggs and sugar together until they are thick and creamy.
7. Pour the cooled chocolate and butter mixture over the eggs and gently fold together with a rubber spatula. Do this gently as not to get rid of all of the air you've just whisked into it.
8. Add the flour and cocoa powder mixture and gently fold in.
9. Finally, stir in the white and milk chocolate chunks until they’re evenly dotted throughout.
10. Pour the mixture into the prepared tin.
11. Put the tray in the oven and set your timer for 25 mins. After this, if you gently shake the tin and the brownie wobbles in the middle, it’s not quite done, so put it back in for another 5 minutes.
12. Leave the whole thing in the tin until completely cold, then, remove and cut into triangles. Melt the remaining white chocolate and drizzle on top of the trees as much or as little as you'd like.
And tadaaaa, there you have it, delicious, festive, triple chocolate brownies.
What is your favourite festive thing to bake?


With Pancake Day around the corner (Tuesday 13th if you were wondering) I thought it was the perfect time to share this recipe. It's not difficult in the slightest, and also doesn't take long to do at all, but the outcome is absolutely delicious.
The batter is made of three ingredients;
- a banana
- 2 eggs
- a tablespoon of flour
(I know lots of recipes for these don't have flour in, but I think it really helps with the texture, and stops it being so much of a banana omelette)
All this recipe requires you to do is mash the banana, stir in the other ingredients and cook them... It's so super easy. Now, if you're not a massive fan of bananas then this perhaps isn't the best recipe for you. Whilst they are delicious, and do look like pancakes, they're not quite like the real thing, and you can most certainly taste the banana.
I tend to top mine with fruit, yogurt and/or ice-cream... They're so easy to make, good for you and taste pretty fab too
Subscribe to:
Posts (Atom)

Social Icons